How to use Bunsen burner
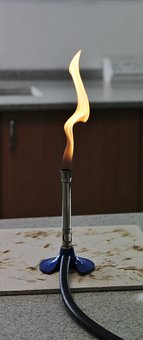
- Place the Bunsen burner on a heat-resistant surface and secure it with a clamp or stand.
- Check that the gas supply is turned on and the tubing is properly connected to the Bunsen burner.
- Light a match or a lighter, and hold it near the burner’s air inlet at the bottom of the barrel.
- Slowly turn the gas valve counterclockwise to allow the gas to flow.
- Adjust the air vent at the bottom of the barrel to control the flame. A blue flame with a well-defined inner cone is ideal for most applications.
- When finished, turn off the gas supply by turning the valve clockwise and allow the burner to cool down before storing it away.
How to use thermometer correctly
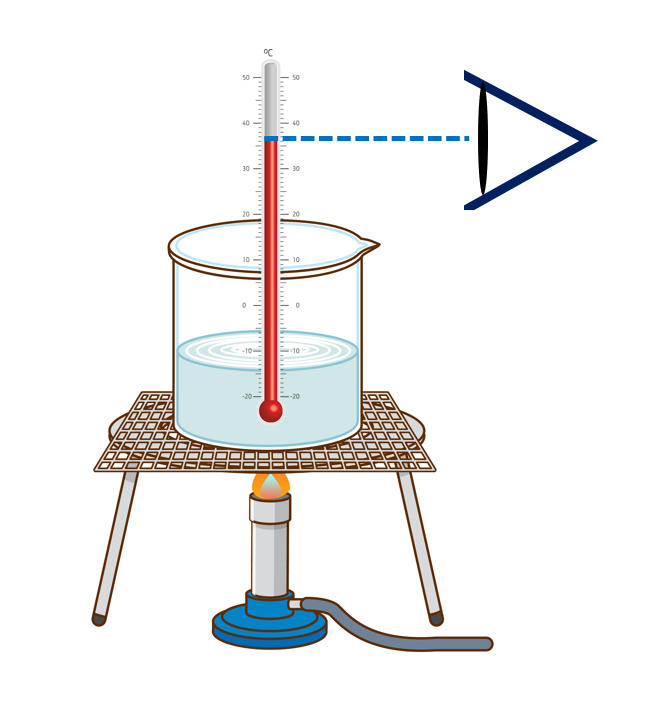
- The thermometer must be held vertically. So that the thermometer’s bulb is in direct contact with the substance or liquid whose temperature is being measured.
- The thermometer should be adjusted to eye level when obtaining readings.
- The eye should be kept in proper alignment with the mercury column. (Note that using below or above is wrong.)
Measuring body temperature, by using clinical thermometer
- First, clean the thermometer bulb using an antiseptic solution.
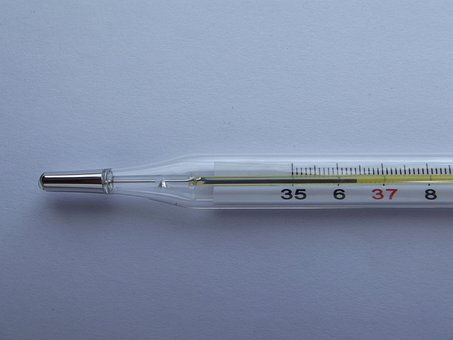
- Keep the thermometer bulb under the patient’s tongue for roughly two minutes.
- Remove the thermometer from your mouth and take an accurate reading while holding it vertically.
Lab Safety precautions
- Wear appropriate personal protective equipment, including lab coats, safety glasses, gloves, and closed-toe shoes.
- Familiarize yourself with the location and proper use of safety equipment, such as fire extinguishers, eyewash stations, and safety showers.
- Follow proper chemical handling and disposal procedures, and be aware of the potential hazards of the chemicals you are working with.
- Keep the work area clean and organized to minimize the risk of spills or accidents.
- Never eat, drink, or smoke in the laboratory, as this can lead to ingestion or inhalation of harmful substances.
- Always handle glassware and other fragile equipment with care, and dispose of broken glass properly.
- Avoid working alone in the laboratory, and always inform others of your location and activities.
- Be mindful of electrical hazards, such as exposed wires and malfunctioning equipment.
- Use caution when working with heat sources, such as Bunsen burners, hot plates, and ovens.
- Always read and follow the instructions and safety guidelines provided for each experiment or procedure, and ask for help or clarification if needed.
What are the steps to follow when burning injury in a laboratory?
- Stop the burning process. If the person’s clothes are on fire, use a fire blanket or a fire extinguisher to put out the flames. Do not use water, as this can spread the flames or cause an electrical shock.
- Move the person away from the source of the burn and to a safe area.
- Evaluate the severity of the burn. Minor burns can be treated with first aid, while more serious burns require immediate medical attention.
- For minor burns, flush the affected area with cool running water for at least 20 minutes. Do not use ice or butter, as these can make the injury worse. Apply a sterile, non-adhesive dressing to the burn.
- For more serious burns, call for emergency medical assistance right away. While waiting for medical help to arrive, continue to cool the affected area with cool water, but do not remove any clothing or objects stuck to the skin.
- Provide first aid to the person as needed, such as CPR or rescue breathing, if the person is not breathing or does not have a pulse.
- Notify the laboratory supervisor or other appropriate personnel about the incident.
- Remember to always take appropriate precautions to prevent burn injuries in the laboratory, such as wearing appropriate personal protective equipment and following safe practices when handling hazardous materials or equipment.
What steps should be taken in the event of a strong acid or strong basic injury in the laboratory?
- Immediately flush the affected area with copious amounts of water for at least 20 minutes. For acid burns, use a bicarbonate or alkali solution to neutralize the acid; for alkali burns, use vinegar or a weak acid to neutralize the base. Do not attempt to neutralize the acid or base with any other chemical without proper training and guidance, as this can make the injury worse.
- Remove any contaminated clothing or jewelry that could trap the acid or base against the skin.
- Seek emergency medical attention immediately.
- Provide first aid to the person as needed, such as CPR or rescue breathing, if the person is not breathing or does not have a pulse.
- Notify the laboratory supervisor or other appropriate personnel about the incident.
- Remember to always take appropriate precautions to prevent acid or base injuries in the laboratory, such as wearing appropriate personal protective equipment and following safe practices when handling hazardous materials or equipment. Be sure to familiarize yourself with the location and proper use of safety equipment, such as emergency eyewash stations and safety showers, in case of an emergency.
Heating techniques that are followed in the laboratory experiments
Heating is a common technique used in laboratory experiments to initiate, accelerate or sustain a chemical reaction, or to modify the physical properties of a sample.
Bunsen burner:
- This is a common heating device that uses a flame to generate heat. It is often used for small-scale heating of test tubes, beakers, or other laboratory glassware.
Hot plate:
- This is a flat heating surface that is powered by electricity. It is often used for heating larger vessels, such as round-bottom flasks or reaction vessels.
Oil bath:
- This is a heating method that involves immersing a sample or reaction vessel in a container filled with oil, which is then heated to the desired temperature.
Sand bath:
- This is a heating method that involves placing a sample or reaction vessel in a container filled with sand, which is then heated to the desired temperature.
Water bath:
- This is a heating method that involves immersing a sample or reaction vessel in a container filled with water, which is then heated to the desired temperature.
Microwave heating:
- This is a heating method that uses microwaves to heat a sample. It is often used for fast, uniform heating of small samples.
What are the chemicals that are heated by shaking when doing experiments?
When conducting experiments in the laboratory, certain chemicals may need to be heated while being shaken to ensure uniform heating and mixing.
Aqueous solutions:
- Water-based solutions are commonly heated by shaking, as shaking helps to prevent overheating and ensures that the temperature is distributed evenly throughout the sample.
Solvents:
- Solvents such as ethanol, methanol, or acetone can be heated by shaking to facilitate the extraction of a desired compound or to evaporate the solvent.
Suspensions:
- Suspensions of solid particles in a liquid can be heated by shaking to prevent settling of the particles and to ensure uniform heating.
Emulsions:
- Emulsions of two immiscible liquids can be heated by shaking to promote the mixing of the two phases and to ensure uniform heating.
It should be noted that not all compounds may be properly heated by shaking, and the suitable heating method for each chemical or sample should be chosen based on the sample’s properties and the specific experimental requirements. Additionally, when handling any chemicals in the laboratory, adequate safety precautions, such as the use of suitable personal protection equipment, should be used.
Mixing techniques used in laboratory experiments
Mixing is an essential technique used in laboratory experiments to ensure that all components of a reaction are evenly distributed and that reactions proceed uniformly. There are many different techniques used for mixing in the laboratory, some of which include:
Stirring:
- This is the most common technique for mixing in the laboratory. It is often done using a magnetic stirrer, which consists of a magnet placed in a container of the reaction mixture that is then rotated by a motor. Alternatively, a mechanical stirrer with a rotating shaft can be used.
Shaking:
- Shaking is often used to mix samples in small vials or tubes. It can be done manually or using a shaker machine that oscillates the samples.
Vortexing:
- Vortexing is a rapid form of shaking that uses a vortex mixer to rapidly spin samples in a circular motion. It is often used to mix small volumes of liquid samples.
Sonication:
- Sonication uses high frequency sound waves to mix samples. It is often used to disperse solid particles in a liquid or to break up clumps of cells.
Homogenization:
- Homogenization involves passing a sample through a narrow aperture under high pressure to break up larger particles or aggregates. It is often used to extract proteins or nucleic acids from cells.
Grinding:
- Grinding involves using a mortar and pestle or a ball mill to break up solid samples into smaller particles. It is often used to extract compounds from plant or animal tissues.
Culture growing techniques
- Sterilizing equipment and materials to prevent contamination.
- Preparing a nutrient-rich medium that provides the necessary nutrients for the organism to grow.
- Inoculating the medium with a small amount of the organism being cultured.
- Incubating the culture at an appropriate temperature and in the appropriate conditions to encourage growth.
- Monitoring the culture for growth and other changes, such as changes in color, texture, or odor.
- Subculturing or transferring the culture as needed to maintain viability and prevent overcrowding or nutrient depletion.
