A plastic cube on a desk started life as a file on a laptop. How a 3D printer works comes down to one idea: the machine builds an object by adding material, one very thin layer at a time, until the shape from the screen exists in the real world. This is called additive manufacturing, and it is the opposite of carving a shape out of a solid block.
In this guide you will follow the four steps from digital design to finished object, compare the three main types of 3D printer (FDM, SLA and SLS), meet the inventors, see real uses in medicine, engineering and space, and use a calculator that tells you how many layers your own print needs. It suits GCSE Design and Technology, Computer Science and Chemistry students, and anyone thinking about buying a first printer.
What is 3D printing? Additive manufacturing explained
3D printing is a way of making a solid object from a digital design by joining material together layer by layer. Engineers call it additive manufacturing because material is added where it is needed. The older approach, subtractive manufacturing, starts with a block and cuts material away using tools such as a milling machine or a lathe.
| Additive (3D printing) | Subtractive (milling, turning) | |
|---|---|---|
| How it works | Builds the object up, layer by layer | Cuts material away from a solid block |
| Waste | Usually little, because only the needed material is used | Offcuts and swarf are removed and thrown away or recycled |
| Complex shapes | Hollow and lattice shapes are possible | Harder, because a tool must be able to reach every surface |
| Best for | One-offs, prototypes and small batches | Large numbers of simple parts |
The international standard ISO/ASTM 52900 sorts additive processes into seven categories: vat photopolymerisation, material jetting, binder jetting, material extrusion, powder bed fusion, sheet lamination and directed energy deposition. You do not need to memorise all seven. The three that matter most for students and hobbyists are FDM (material extrusion), SLA (vat photopolymerisation) and SLS (powder bed fusion), and each gets a section later in this article.
3D printers also appear in school computing courses as an output device, like a screen or a 2D printer. If you are revising for that exam, our guide to IGCSE Computer Science shows where output devices fit into the wider syllabus.
Who invented the 3D printer? A short history
There is no single inventor, because several people patented different methods within a few years of each other. The dates below come from the patents themselves.
- 8 August 1984: American engineer Chuck Hull files a patent for making objects by stereolithography, a word he coined. It was granted on 11 March 1986 as US 4,575,330.
- 1986: Hull co-founds the company 3D Systems. In the same year, on 17 October, Carl Deckard of the University of Texas files a patent for selective laser sintering (SLS), granted in 1989.
- 1987: 3D Systems develops the SLA-1, which the engineering society ASME describes as the first 3D printer made for commercial sale.
- 1988: The STL file format is first documented. It is still widely used to send models to printers.
- 1989: Scott Crump files the patent for fused deposition modelling (FDM), granted in 1992. The story goes that he first tried the idea in 1988 by making a toy frog for his daughter with a glue gun loaded with polyethylene and candle wax. The same year, researchers at MIT file a patent that uses the phrase "three-dimensional printing" for a powder-and-binder process.
- 2004 to 2008: Adrian Bowyer at the University of Bath has the idea for RepRap, an open-source printer designed to print many of its own parts. By 2008 a RepRap machine had printed about 48% of its own parts (not counting fasteners and electronics). Because the designs were free to copy, RepRap helped to bring low-cost desktop printers to schools and homes.
- 2014: The first 3D printer is installed on the International Space Station. You can read about it in the uses section below.
Desktop printers have found their way into many school design workshops, where STEM education projects can take a student from a part designed on screen to an object they can hold.
How a 3D printer works: the four steps
Whatever the machine, the journey from idea to object follows the same pattern. The details below describe the most common type, the FDM printer, which melts plastic.
- Design: create or download a 3D model and save it as a file.
- Slice: special software cuts the model into thin layers and writes instructions for the printer.
- Melt and deposit: the printer heats plastic and squeezes it out through a nozzle.
- Build layer by layer: the layers stack and bond into a solid object, which you then finish.
Resin and powder printers change step three, because they harden a liquid or fuse a powder instead of melting a thread of plastic, but the overall layer by layer idea stays the same.
Step 1: create a digital model (CAD)
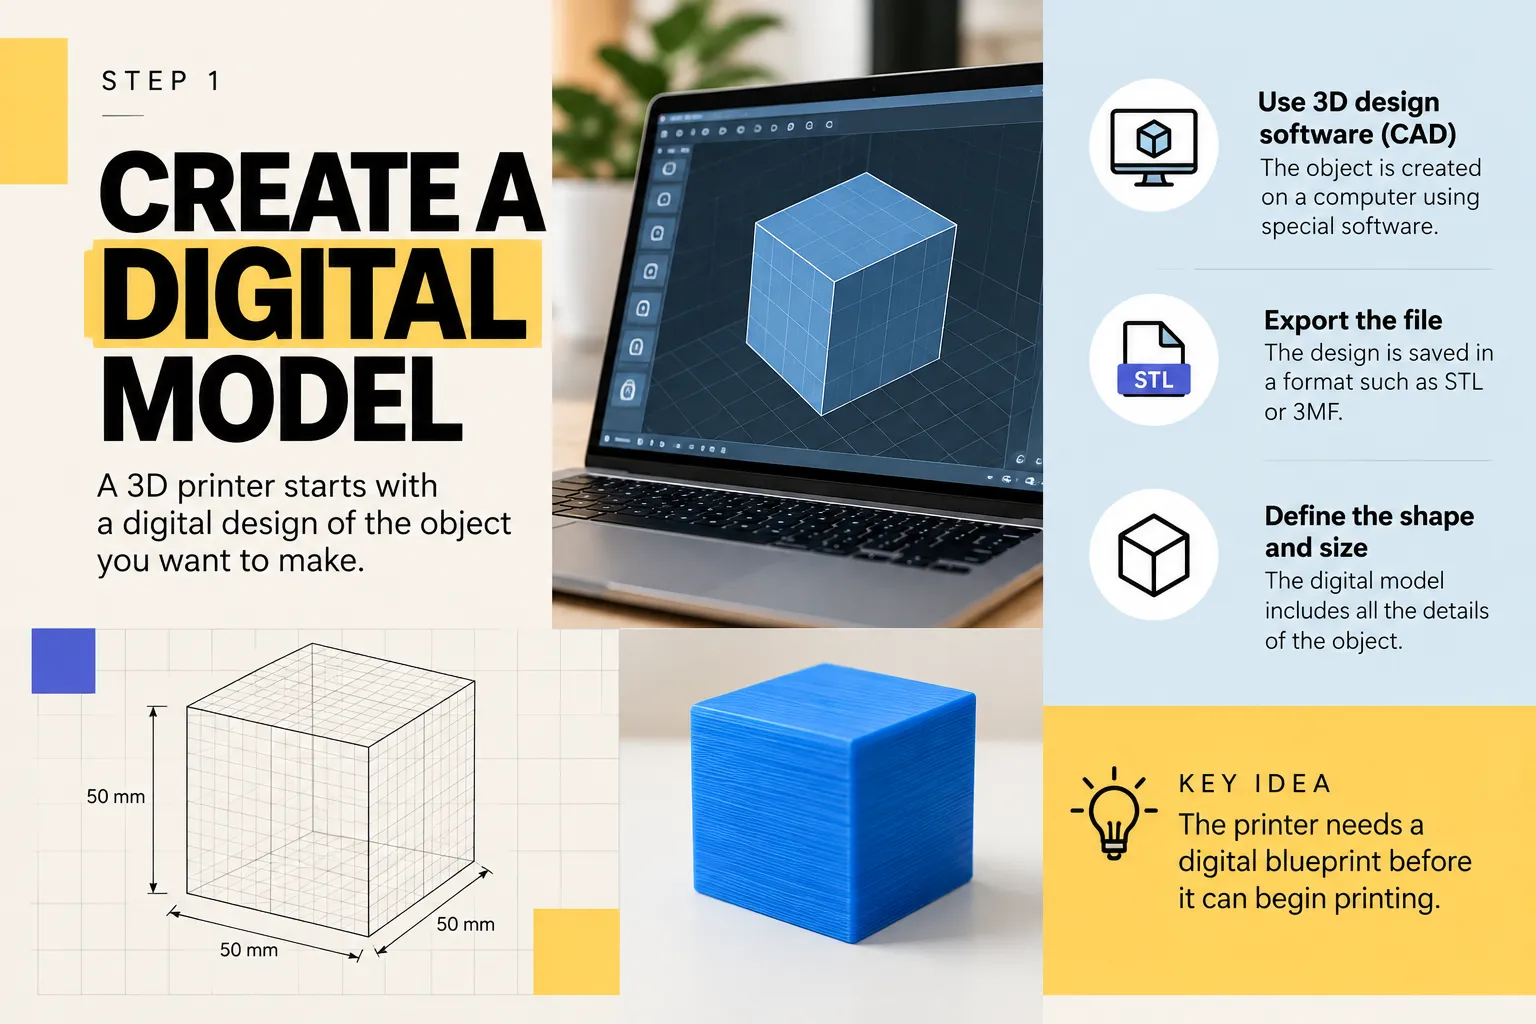
Every print starts as a 3D model on a computer. You can design one yourself in CAD (computer-aided design) software such as Tinkercad, Fusion 360 or SketchUp, download a ready-made model, or capture a real object with a 3D scanner. The infographic above shows a simple 50 mm cube being designed, saved and printed.
The finished design is then exported as a file the printer software can read. The two most common formats are STL and 3MF. A CAD program does not slice the model: that is the job of a separate program, which is the subject of the next step.
What is an STL file?
STL stands for "stereolithography", the process Chuck Hull patented, and the format was first documented in 1988. An STL file describes the outside surface of an object as a mesh of small triangles. Each triangle is stored as the coordinates of its three corners plus a direction that points outwards from the surface.
Splitting a surface into triangles is called tessellation. A flat face needs only a few triangles, but a curved surface such as a sphere is approximated by many tiny flat ones. More triangles give a smoother curve but a bigger file, and a rough model looks faceted if you zoom in.
Why does an STL file store the surface as triangles? (1 mark)
Any surface can be approximated by flat triangles, and three points always define a flat face, so the software can store and process the shape in a simple, consistent way.
With a digital model ready, the next stage is to turn it into something a printer can follow, one layer at a time.
Step 2: slicing the model and writing G-code
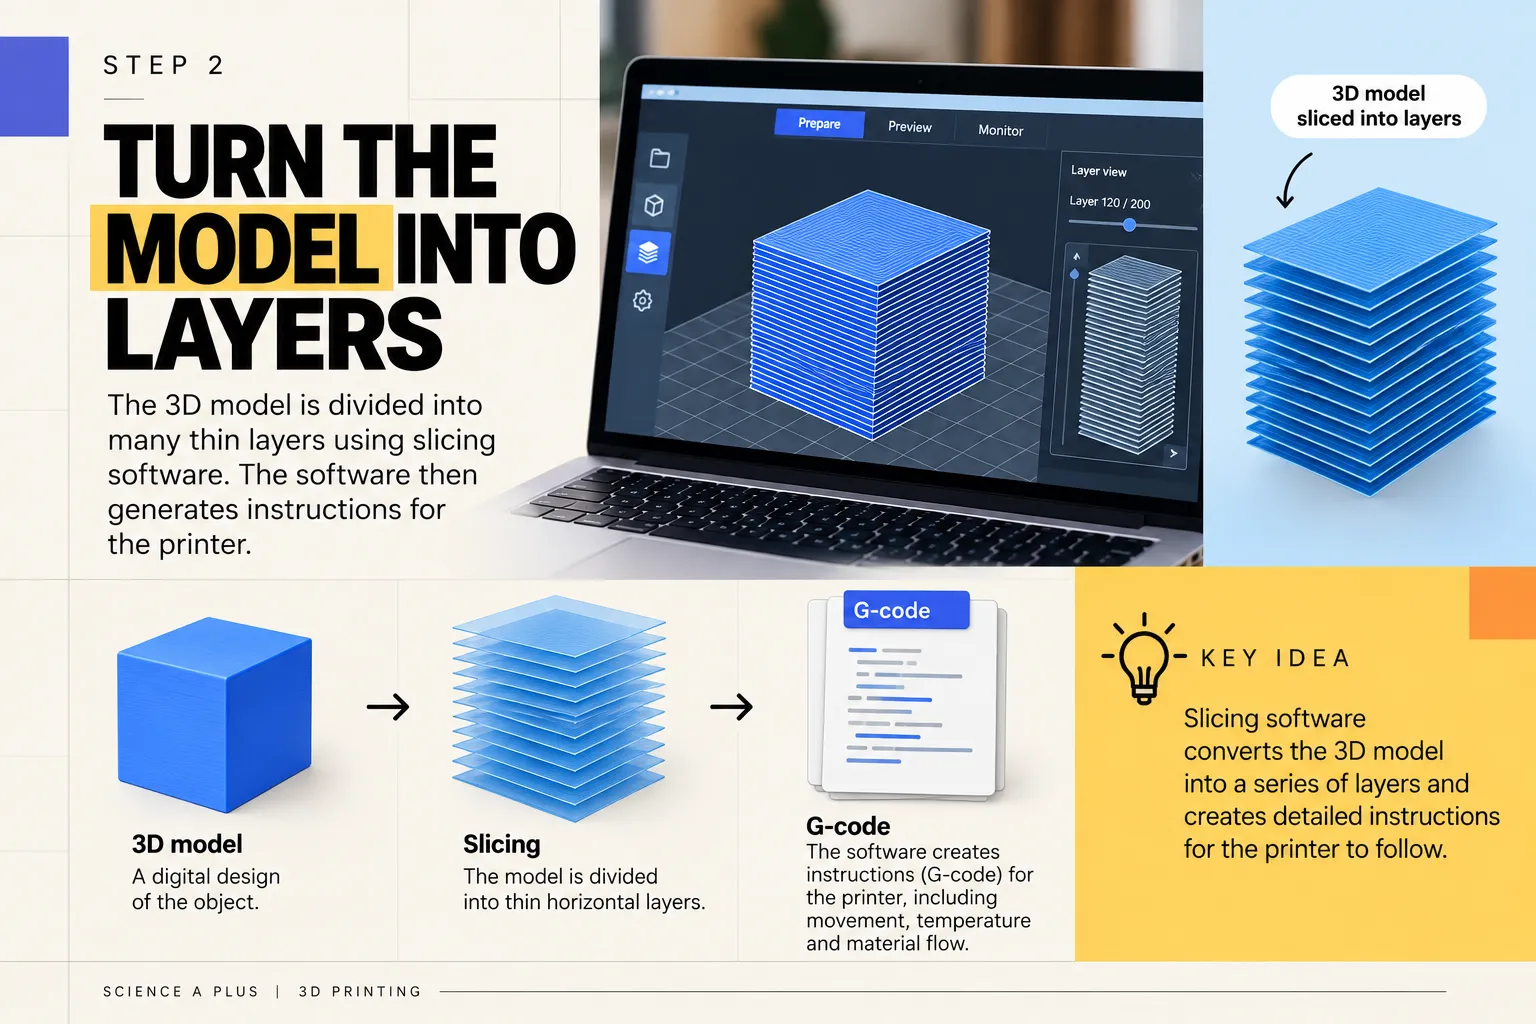
A printer cannot read a CAD file directly. It needs a list of tiny movements, and the program that creates that list is called a slicer. The slicer takes your STL or 3MF file, cuts the model into thin horizontal layers (like slicing a loaf of bread), and works out the path the nozzle must follow to draw each one.
The result is a file of G-code. G-code is a plain list of commands that tell the printer where to move along the X, Y and Z axes, what temperature to reach, and how much material to push out. The printer simply follows the list from the first line to the last.
Before slicing, you choose the settings that shape the final result:
- Layer height: the thickness of each layer, which controls how smooth the surface looks and how long the print takes.
- Infill: the pattern printed inside the object. A part can be mostly air on the inside and still be strong enough for many jobs.
- Walls (perimeters): the outlines printed around each layer, which form the outside skin.
- Supports: temporary structures printed under overhanging parts.
- Orientation: which way up the object sits on the build plate.
- Speed: how fast the print head moves while it prints.
Step 3: how a 3D printer melts and deposits plastic
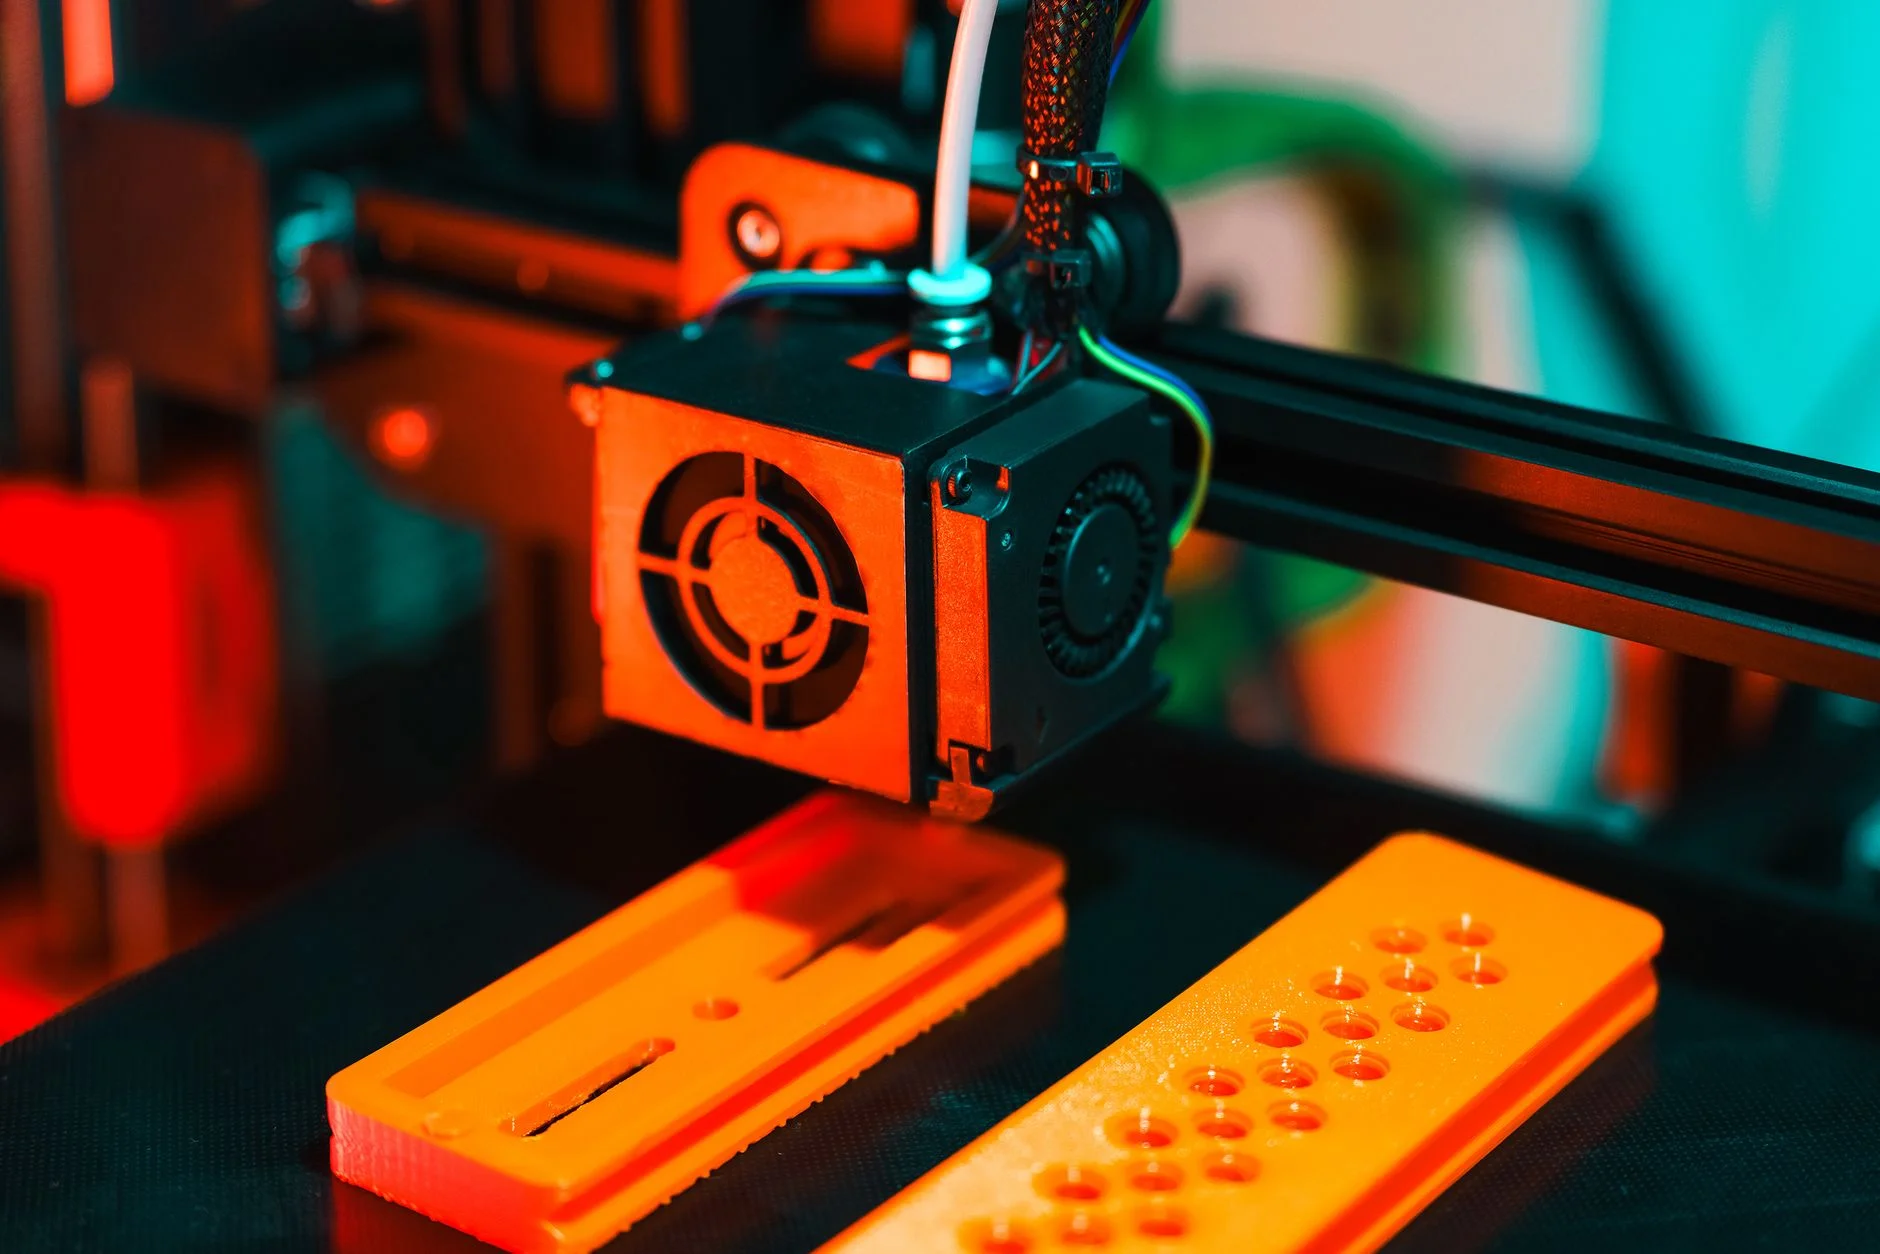
This is the step that most people picture when they think of a 3D printer. In an FDM printer the plastic starts as a solid thread called filament, wound on a spool. Follow the path through the machine:
- The spool feeds filament towards the extruder, where gears grip the thread and push it forward.
- The filament enters the hot end, where a heater block melts it.
- The molten plastic is squeezed out through a tiny hole, the nozzle. The most common nozzle is 0.4 mm across.
- The printer moves the nozzle (or the bed) so that the plastic is laid down as a thin line in the shape the G-code describes.
- The line cools, hardens and bonds to the layer beneath it. A fan blows air over the fresh plastic to help it set quickly.
Most printers also have a heated bed. Keeping the build plate warm (around 60 °C for PLA, a very common plastic) helps the first layer stick so that the part does not curl or slide while it is printed.
Melting and then cooling plastic is a physical change. The plastic changes state from solid to molten and back to solid, but no new substance forms, which is why filament can be melted again. Resin printers are different, and we compare the two in the section on physical and chemical change later on.
What materials do FDM printers use?
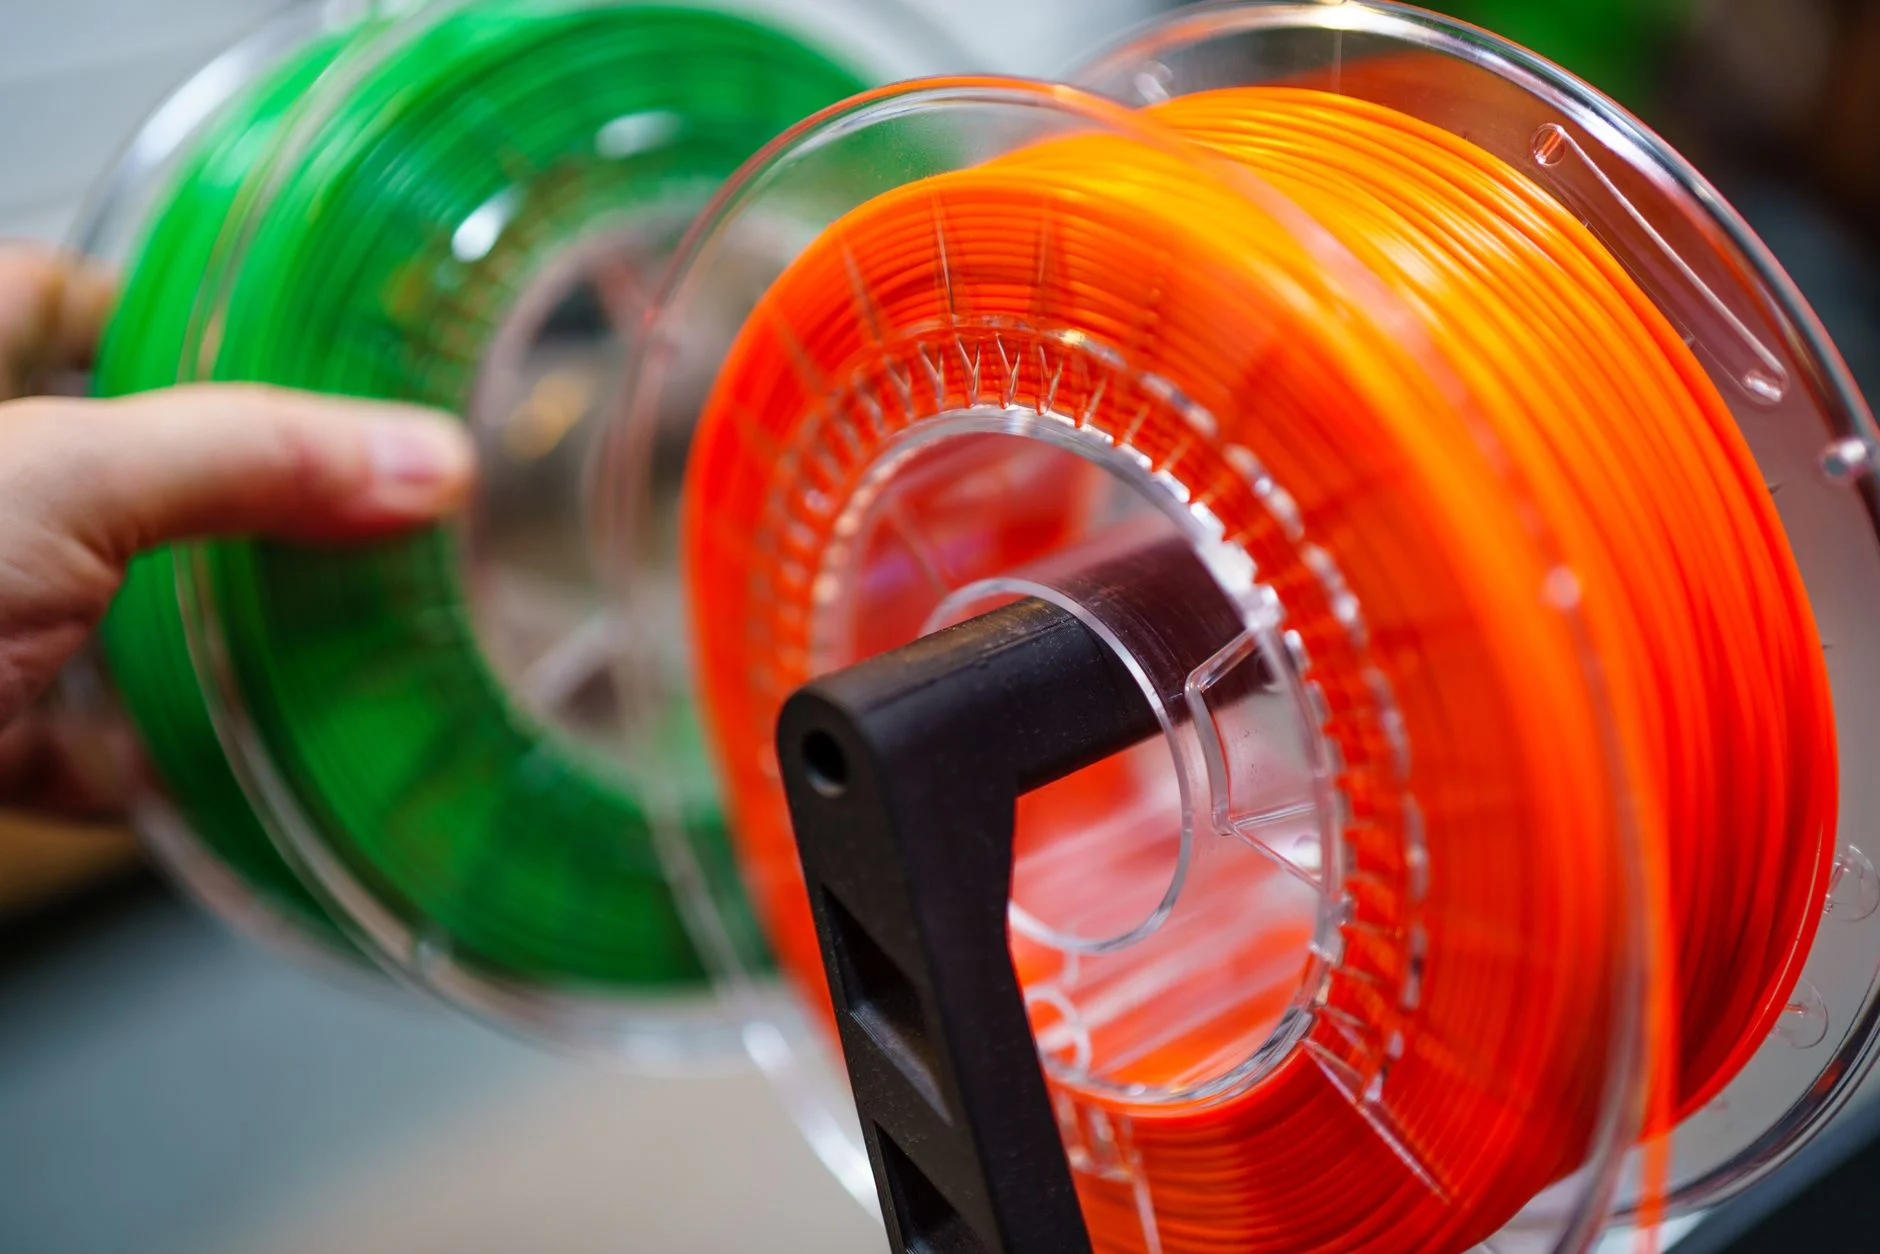
The most popular beginner filament is PLA (polylactic acid). It is a plant-based polyester made from sources such as corn, sugar cane or sugar beet, and it prints at fairly low temperatures. Prusa, a well-known printer maker, recommends a nozzle temperature of about 215 °C for the first layer and 210 °C for the rest, with the bed at 60 °C. Other brands quote roughly 190 to 220 °C, so always check the label on the spool.
PLA has one big limit: it softens and deforms at temperatures over about 60 °C. A PLA phone stand left on a sunny car dashboard could lose its shape, so tougher plastics are used for parts that get hot. Other common filaments include PETG, ABS and nylon, each with its own strengths and settings.
PLA is sometimes described as a greener option because it is plant-based. Our article on environmentally friendly plastics looks at the wider picture. PLA is still a plastic, though, so failed prints and waste are worth thinking about, and the disadvantages of plastics apply here too.
Layer height: why thin layers look smoother
Layer height is the thickness of each layer of plastic. It affects only the vertical detail of a print: thin layers hide the steps on curved surfaces, while thick layers print faster but show clear ridges.
Prusa's guidance gives useful limits. Layer height should stay below 80% of the nozzle diameter, which is about 0.32 mm for a 0.4 mm nozzle. Prusa does not suggest going below 0.10 mm, and its profiles use 0.20 mm for the first layer.
The number of layers is simple to work out:
number of layers = object height ÷ layer height
Halving the layer height doubles the number of layers, so the print takes much longer. Try it yourself with the calculator, first at the standard 0.2 mm and then at 0.1 mm.
Step 4: building the object layer by layer
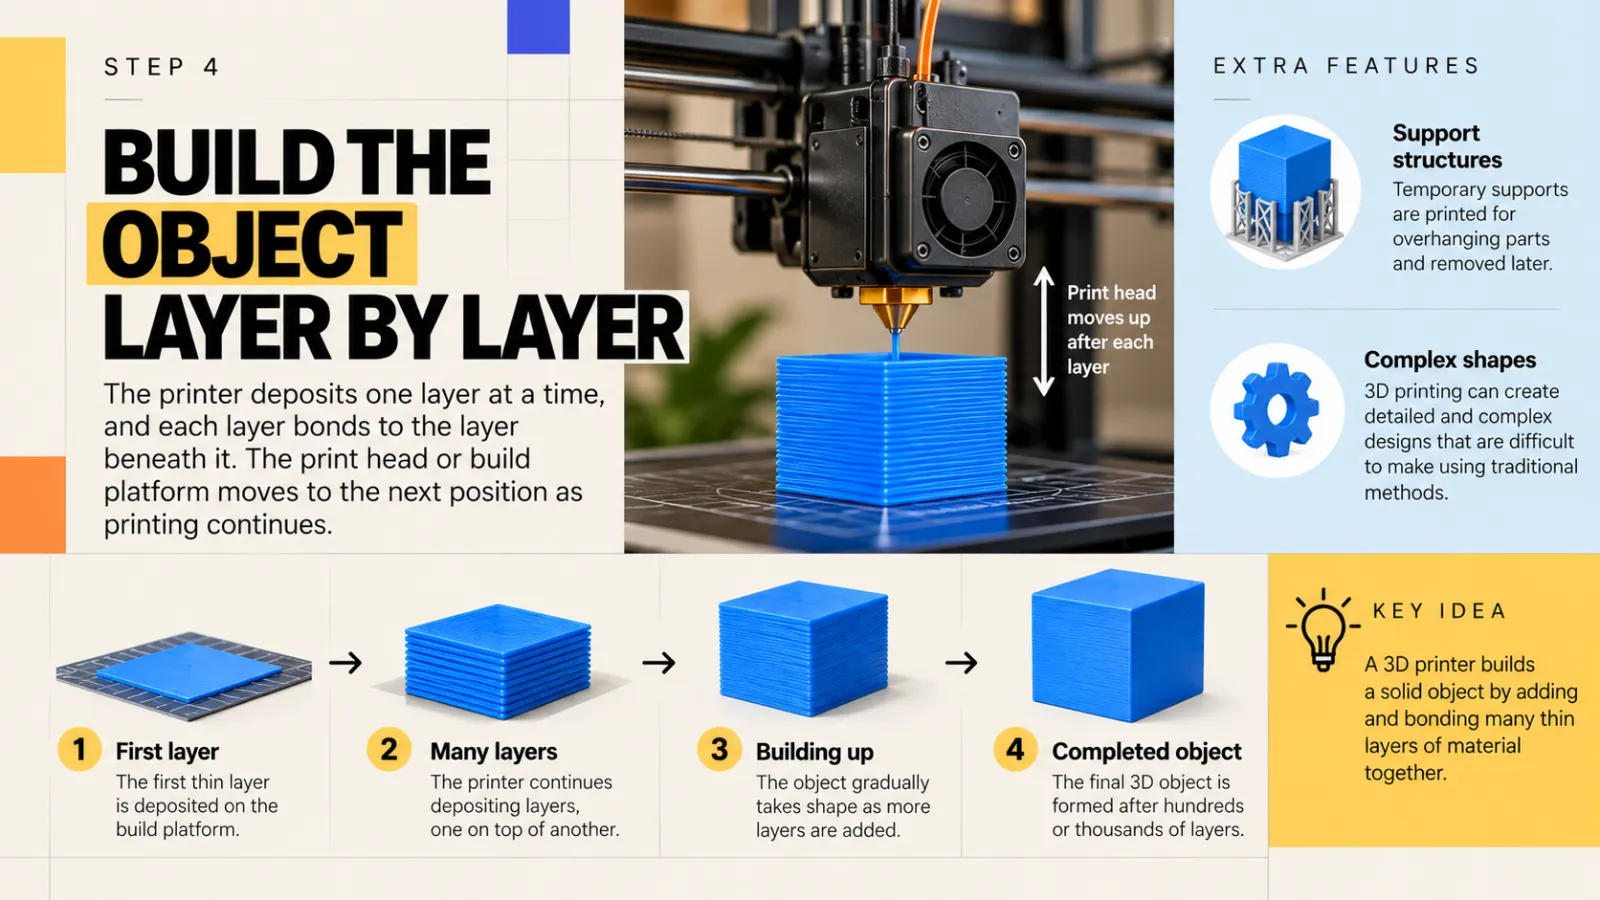
Once the first layer is down, the printer repeats the same routine hundreds or thousands of times. After each layer, the nozzle moves up by one layer height (on some machines, the bed moves down instead). The new layer of hot plastic is pressed on top of the cooled one below and fuses with it, so the stack becomes one solid object.
This also explains a weakness of FDM parts. The bond between layers is usually weaker than the plastic within a single layer, so a printed part tends to break along the layer lines if it is pulled or bent in the wrong direction. Orientation matters for strength as well as for looks.
Support structures and overhangs
A printer cannot lay plastic onto thin air. If a part has an overhang, such as the underside of a bridge or an outstretched arm, the plastic would sag. The slicer solves this by adding support structures: temporary scaffolding printed underneath the overhang. You snap or cut the supports off when the print is finished, and the surface they touched usually needs a little cleaning up.
A 30 mm tall model is printed with 0.2 mm layers. How many layers does it need, and what happens to that number at 0.1 mm? (2 marks)
30 ÷ 0.2 = 150 layers. At 0.1 mm the number doubles to 300 layers, so the print will take roughly twice as long.
Every 3D printer follows the same basic idea of building an object layer by layer, but there are three main ways of making each layer. One melts a plastic thread, one hardens a liquid with light, and one fuses a powder with a laser. Knowing the difference helps you choose the right machine and answer exam questions about it.
Types of 3D printers: FDM, SLA and SLS
FDM (FFF): melted plastic filament
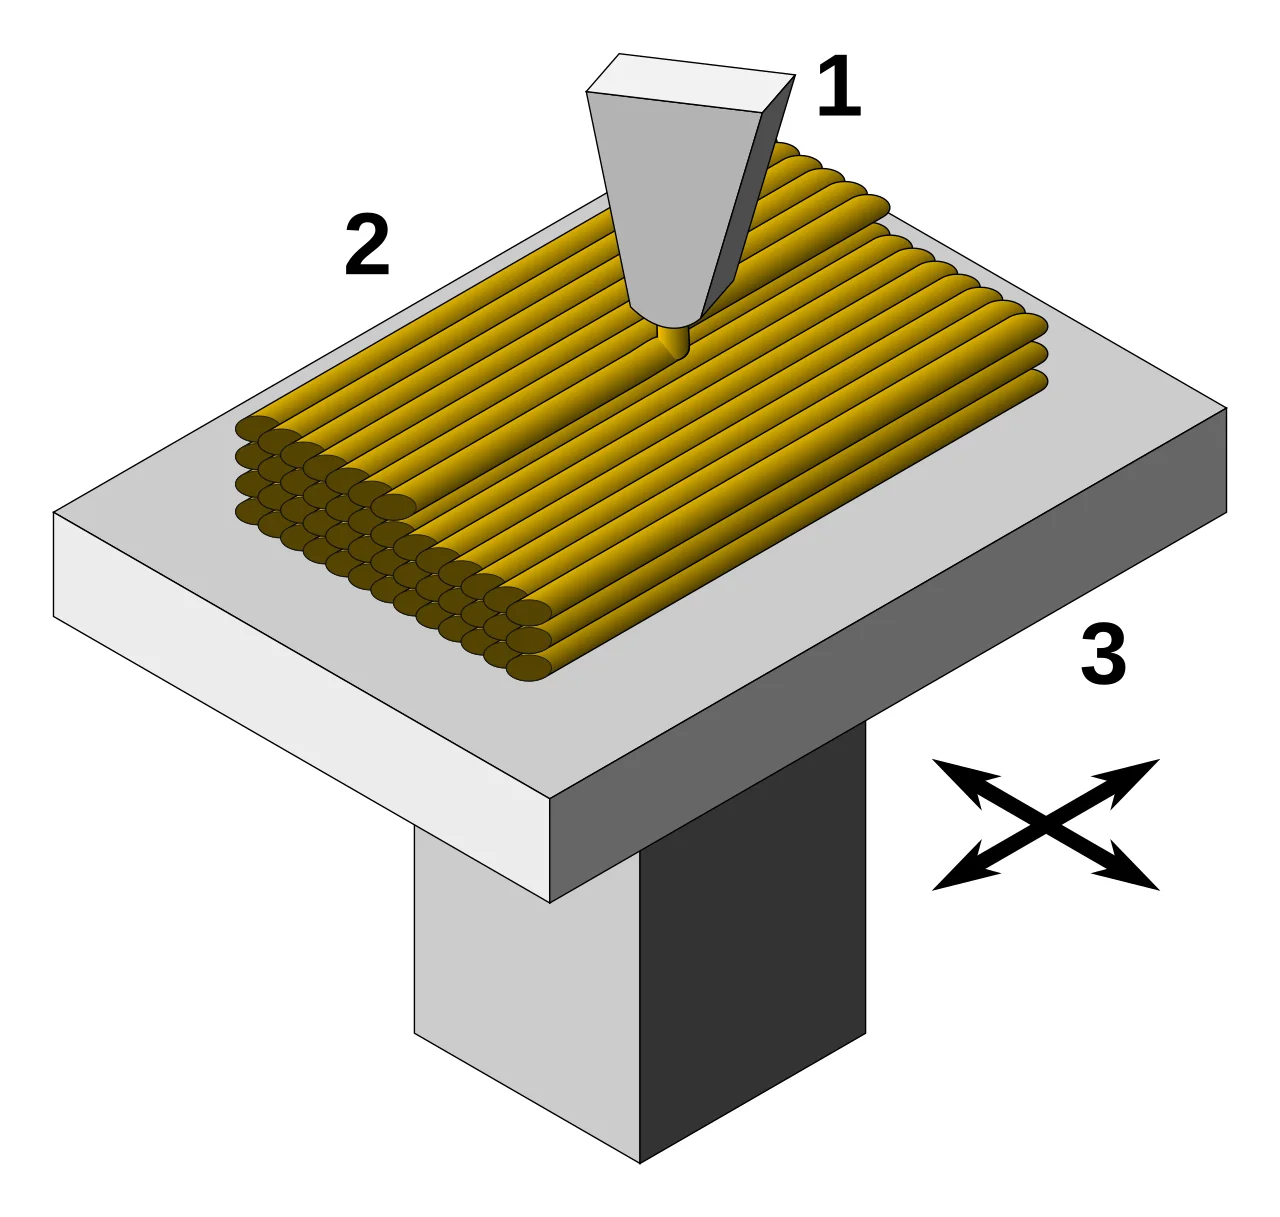
Fused deposition modelling (FDM) is the process described in the previous steps. In the official classification it is a material extrusion process: thermoplastic filament is pushed through a heated nozzle and laid down in a set pattern. "FDM" is a trademark of the company Stratasys, so many people and manufacturers call the same process FFF, short for fused filament fabrication.
FDM machines and materials are low in cost, and they are fast and easy to use for simple parts. That is why they are widely used for prototypes and in education. The trade-offs are lower accuracy and detail than the other two types, and parts that can be weaker between the layers.
SLA: resin hardened by light
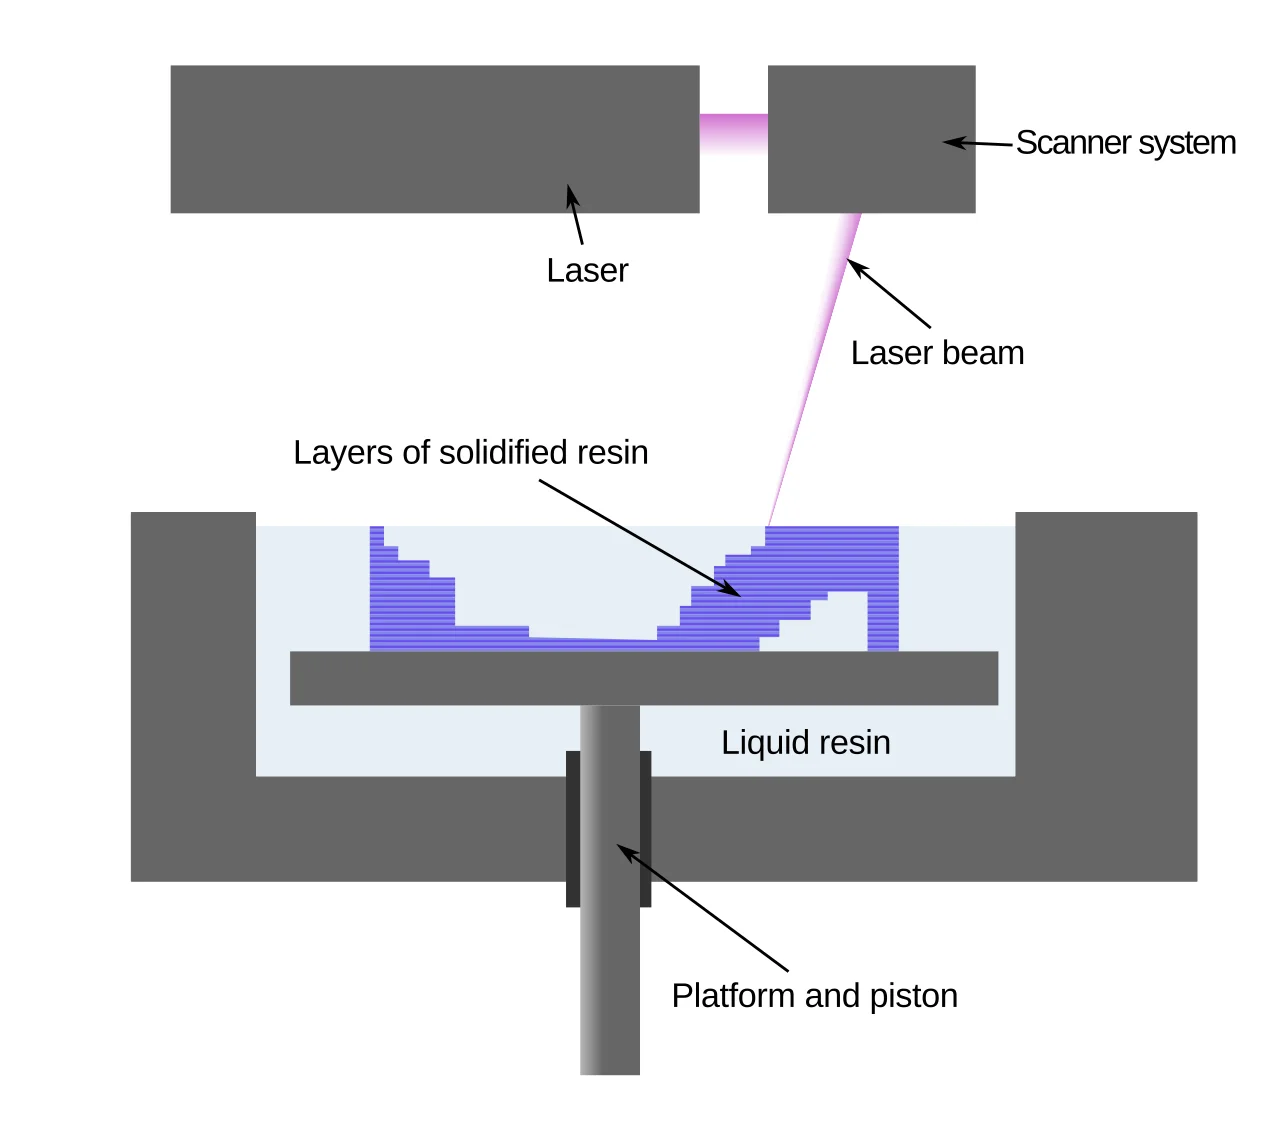
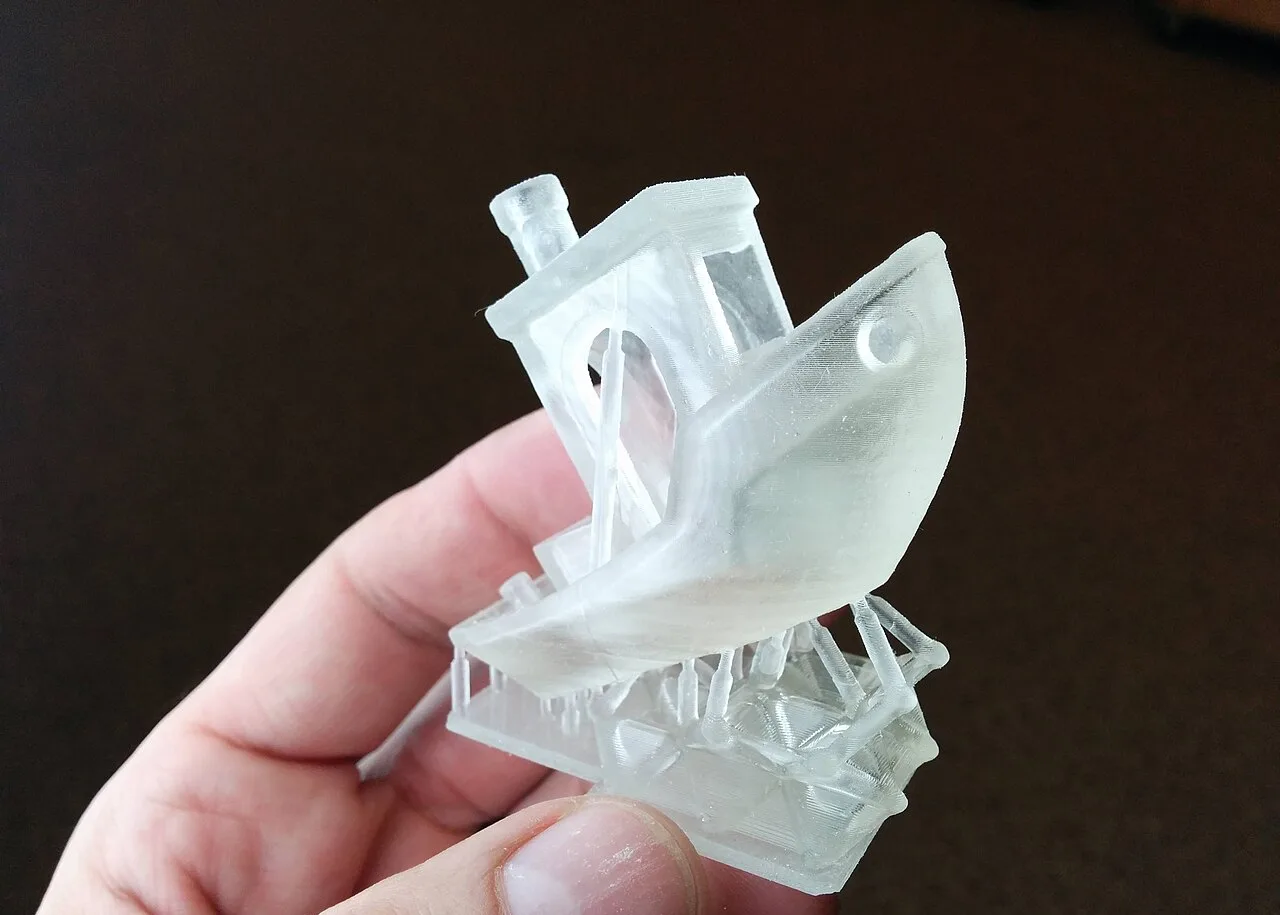
Stereolithography (SLA) is the process Chuck Hull patented in 1984. It is a vat photopolymerisation process. A vat holds liquid resin, and a light source (a UV laser, a projector or an array of LEDs) traces the shape of each layer on it. Wherever the light lands, the liquid hardens. The platform then moves by one layer thickness, and the next layer is drawn.
SLA prints have high accuracy and smooth surfaces, so they are used for dental and medical models, jewellery casting and detailed prototypes. The drawbacks are that the resin costs more than filament and that every part must be washed and then post-cured with more light. Resin is a chemical, so wear gloves and follow the manufacturer's safety instructions when you handle it.
The hardening process is photopolymerisation: light makes small liquid molecules join together into a long-chain solid polymer. If you want to see how that fits into the bigger picture of chemistry, read our guide to what a chemical reaction is.
SLS: powder fused by a laser
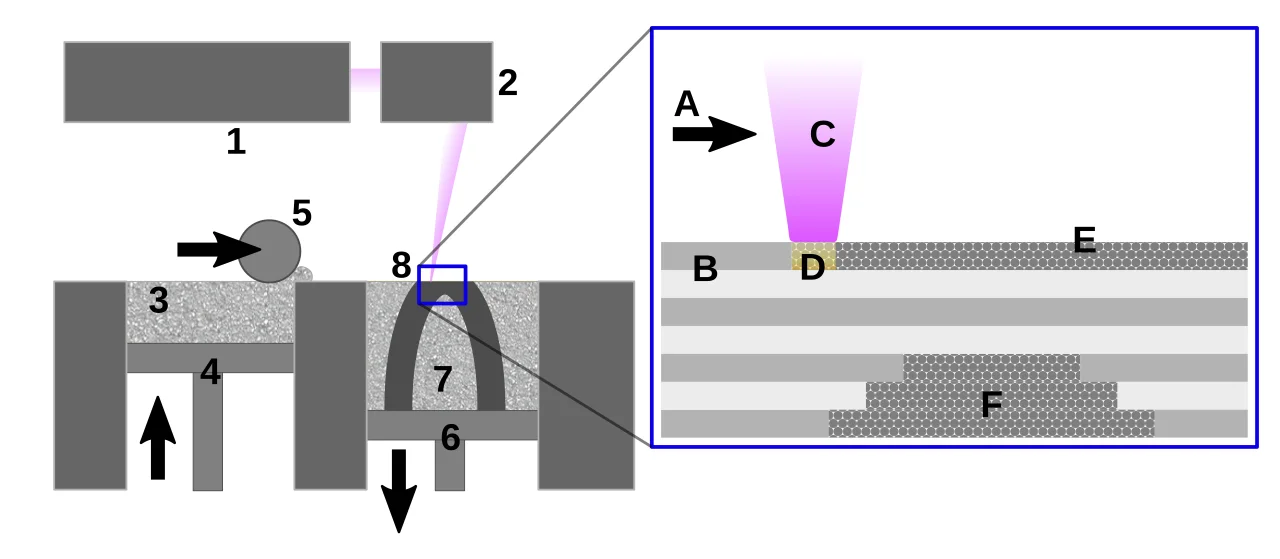
Selective laser sintering (SLS) was patented by Carl Deckard, who filed in 1986. It is a powder bed fusion process. A roller spreads a thin layer of fine polymer powder across the build area, and a high-powered laser fuses the particles together in the shape of that layer. The platform then lowers, a fresh layer of powder is spread, and the laser draws the next layer.
Nylon is the most common material. The big advantage is that the loose, unfused powder supports the part while it is printing, so there are no supports to remove, even for complex shapes. SLS makes strong, functional parts, but the surface is slightly rough and the machines are expensive. Metal powder versions exist in the same family, and they are used for parts such as aircraft fuel nozzles (see the uses section below).
FDM, SLA and SLS compared
| Type | Material | How a layer is made | Supports? | Good for | Drawbacks |
|---|---|---|---|---|---|
| FDM (FFF) | Plastic filament such as PLA | Melted plastic is extruded through a nozzle | Yes, for overhangs | Low-cost prototypes, school projects, simple parts | Lower detail; weaker between layers |
| SLA | Liquid resin | Light hardens the resin | Yes, for overhangs | Fine detail, smooth models, dental and jewellery work | Washing and post-curing needed; resin costs more |
| SLS | Nylon powder | Laser fuses the powder | No, the powder supports the part | Strong, functional parts | Rough surface; expensive machines |
Is 3D printing a physical or chemical change?
This question links 3D printing to GCSE Chemistry. A physical change alters the state or shape of a substance without making a new substance, and it can usually be reversed. A chemical change makes new substances and is not easily reversed. The three printer types sit on both sides of that line.
- FDM: heating filament until it is molten and letting it cool again is a physical change. It is the same plastic before and after, only its state has changed.
- SLA: resin hardening under light is a chemical change. Small molecules join into a solid polymer, and the solid cannot be melted back into liquid resin.
- SLS: the powder is heated until the particles fuse together. Sintering is a heating process that fuses grains together without turning the whole powder into a pool of liquid (the grain surfaces soften or partly melt), so it is generally treated as a physical change.
Test your vocabulary with these flip cards before moving on.
For a part with very fine detail, SLA is the usual choice, and for strong functional parts SLS is. For a quick classroom prototype, a low-cost FDM printer is usually the sensible option.
After the print: finishing and your first print
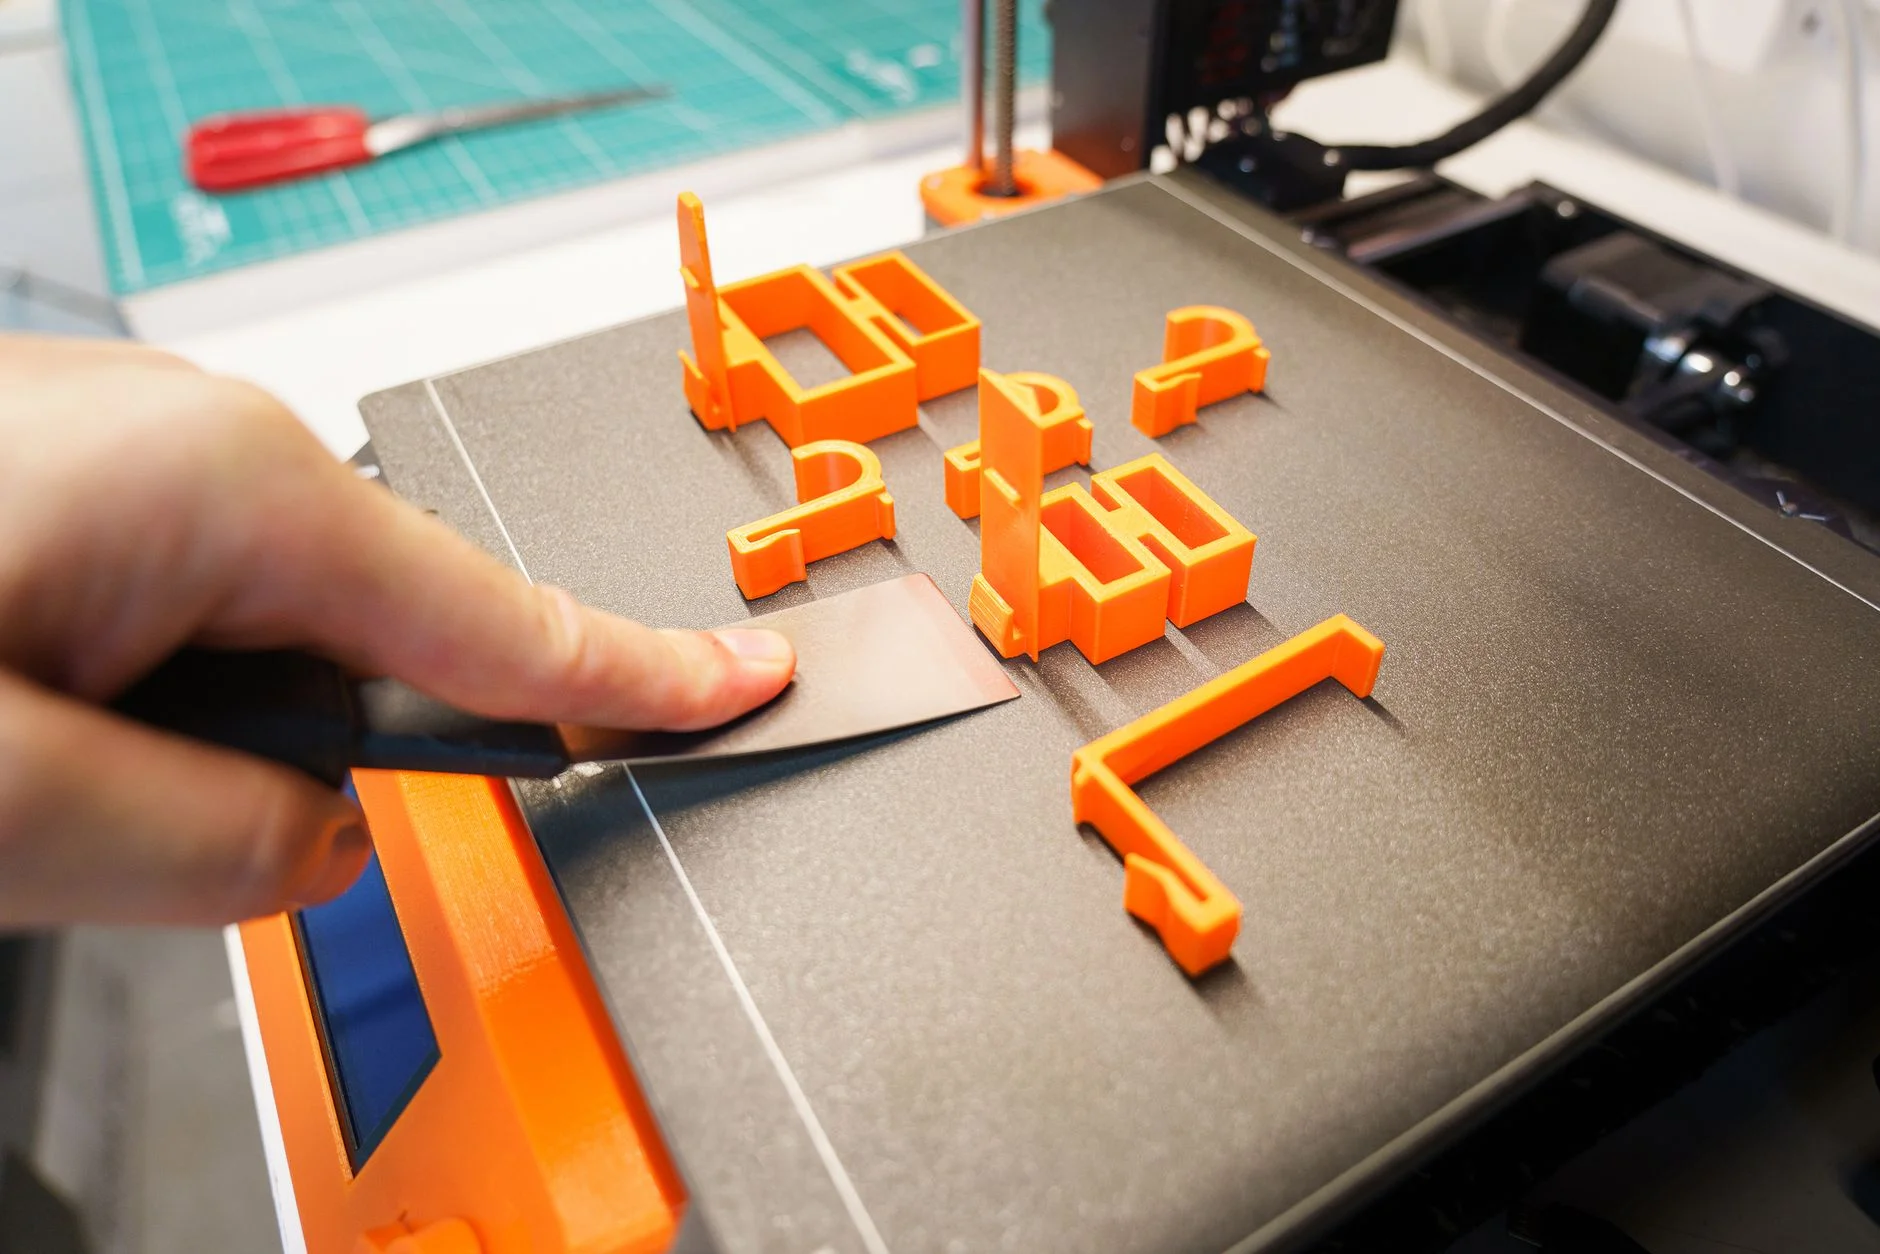
A print is not finished when the printer stops. Let the build plate cool, then ease the part off, using a thin spatula if it is stuck. Next, remove any support structures and tidy rough patches. With a resin printer there are two more jobs: wash the part to remove liquid resin, then cure it with extra light so that it reaches full hardness.
If you are about to run your first FDM print, this checklist covers the essentials. Your ticks are remembered in your browser.
- The model is exported as an STL or 3MF file.
- It is sliced with the right profile for your filament.
- The build plate is clean and the bed is levelled or calibrated as the maker instructs.
- You watched the first layer go down to check that it sticks.
- You have read and are following the printer's safety instructions.
- You waited for the bed to cool before removing the part.
- Failed prints are kept aside for recycling where a scheme accepts them.
That last point matters, because every failed print is wasted plastic. Our tips on how to reduce plastic waste are a good place to start.
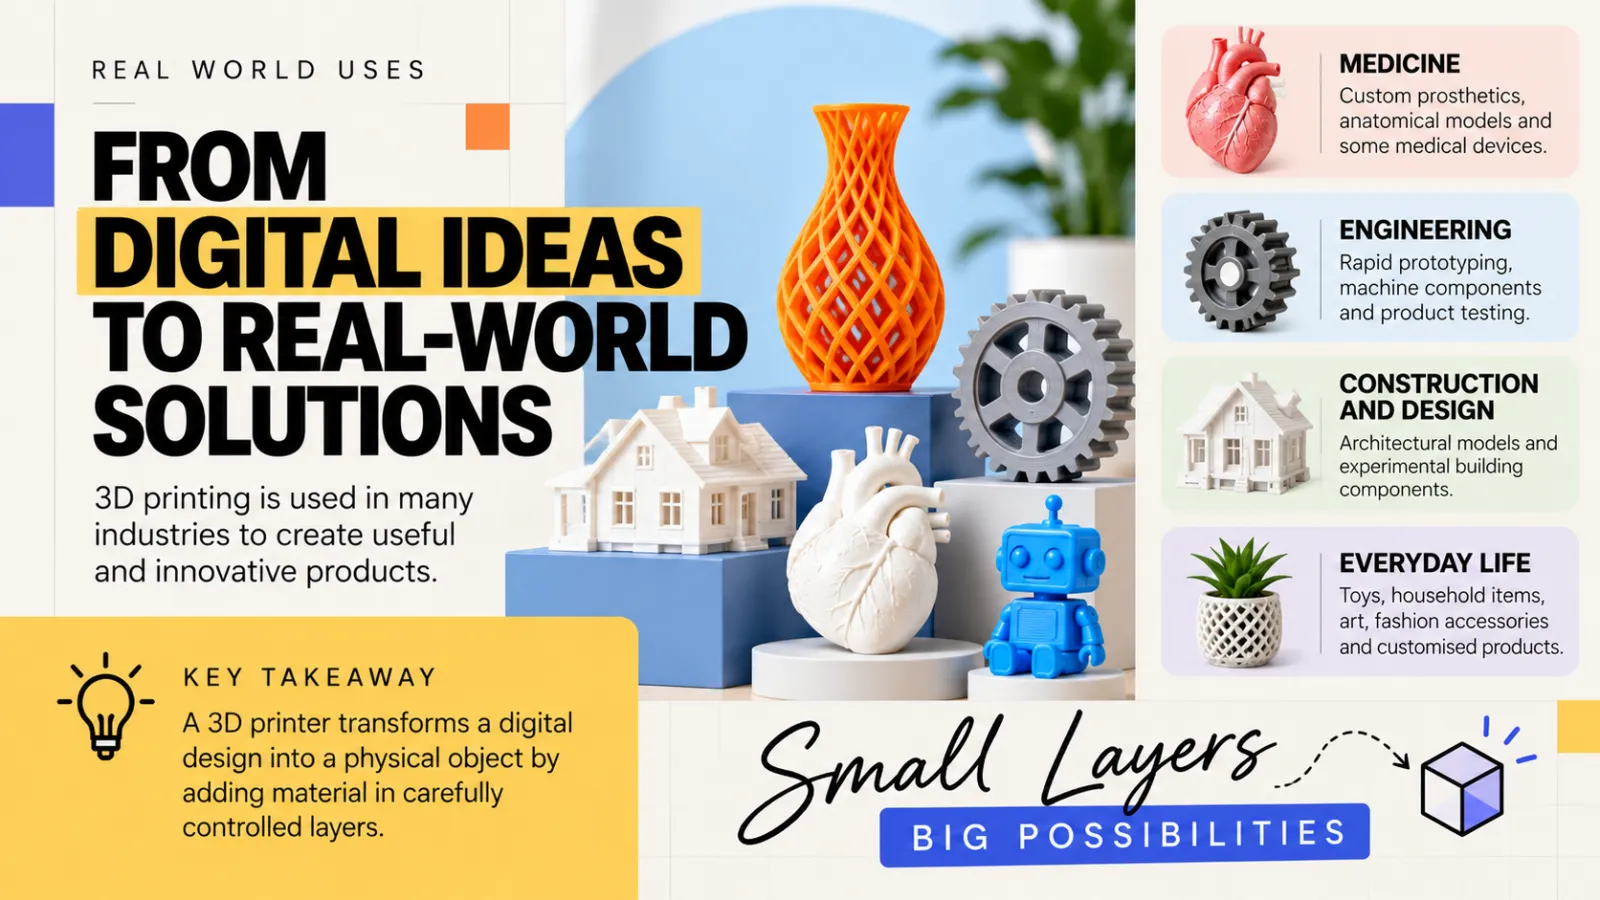
What is 3D printing used for?
Medicine and dentistry
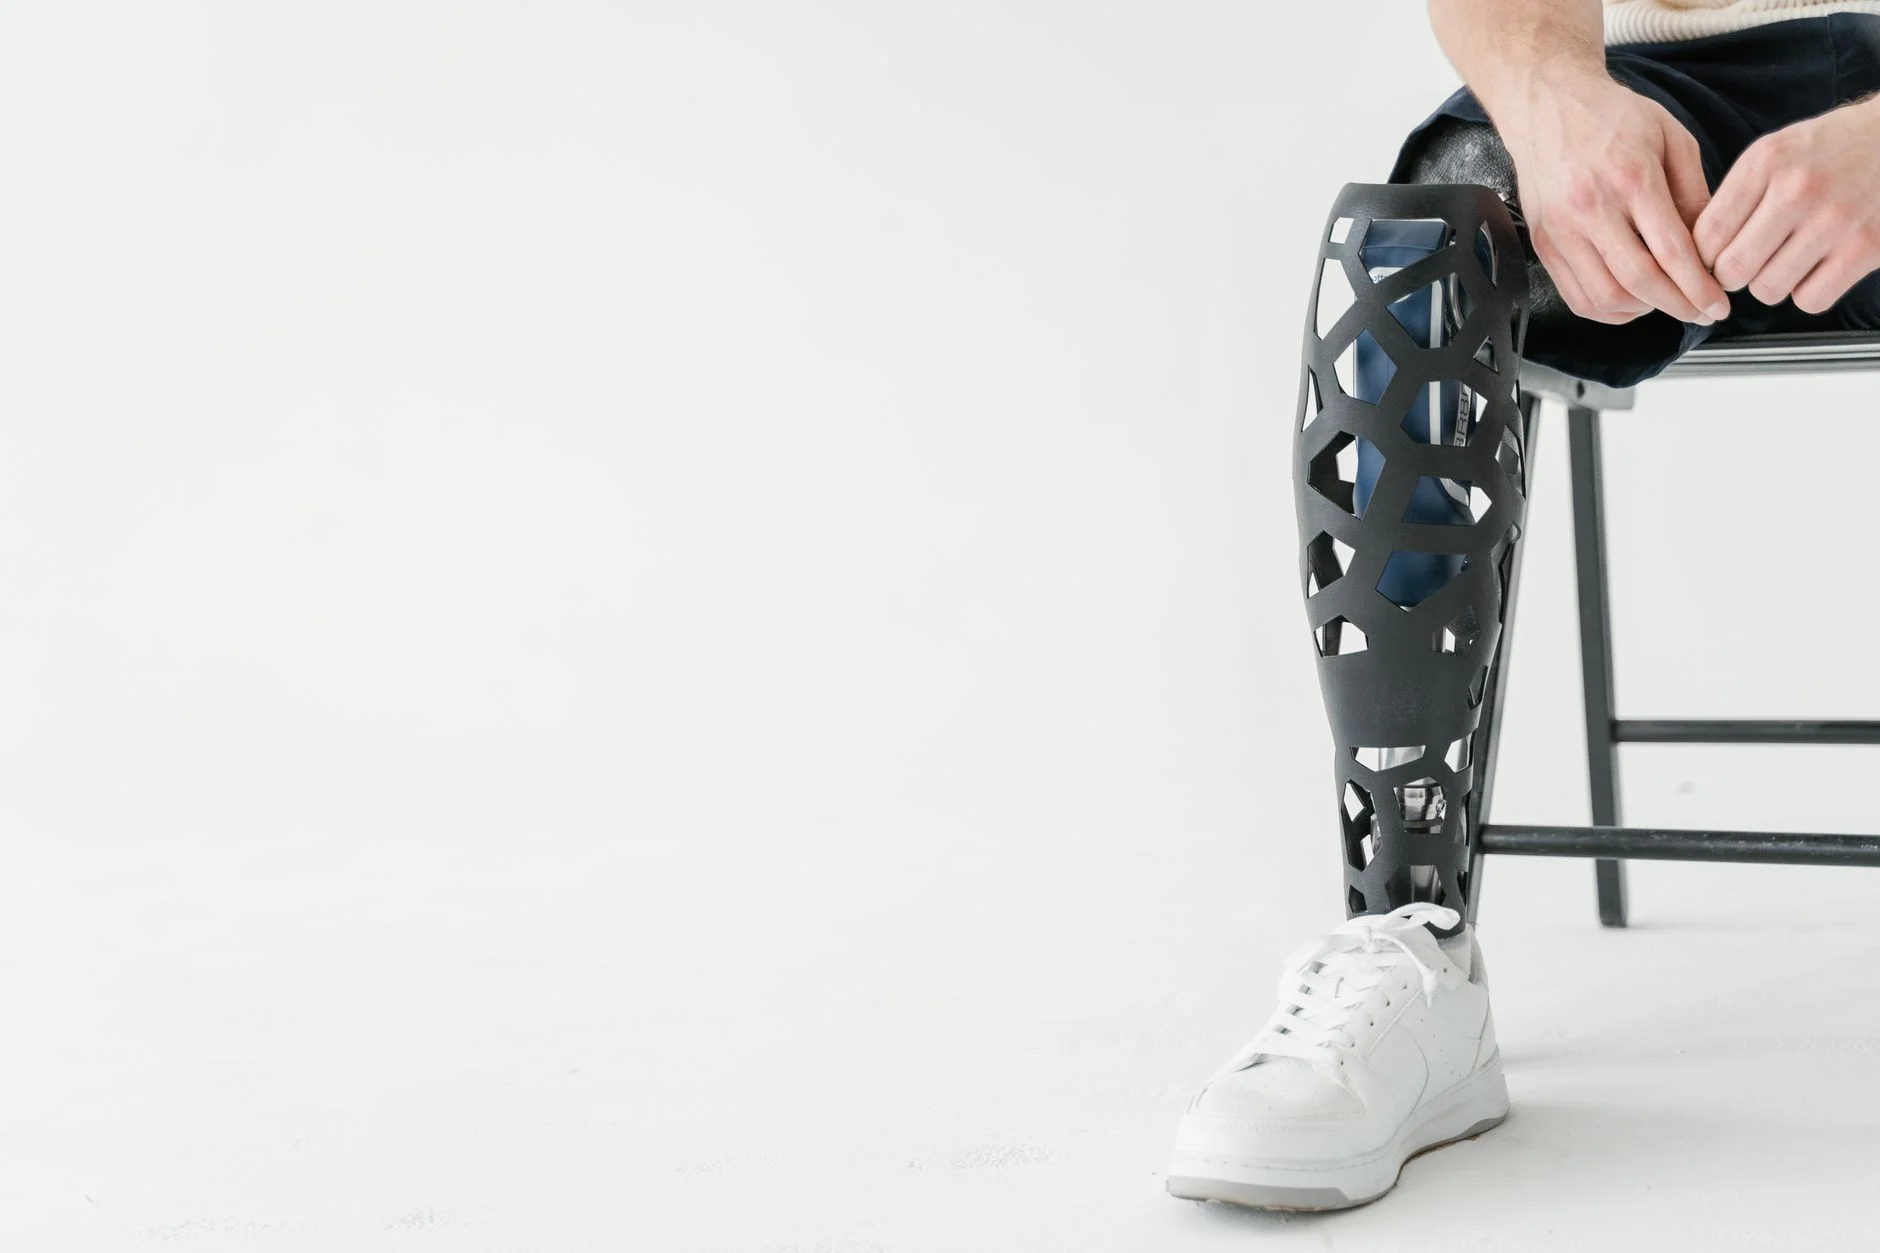
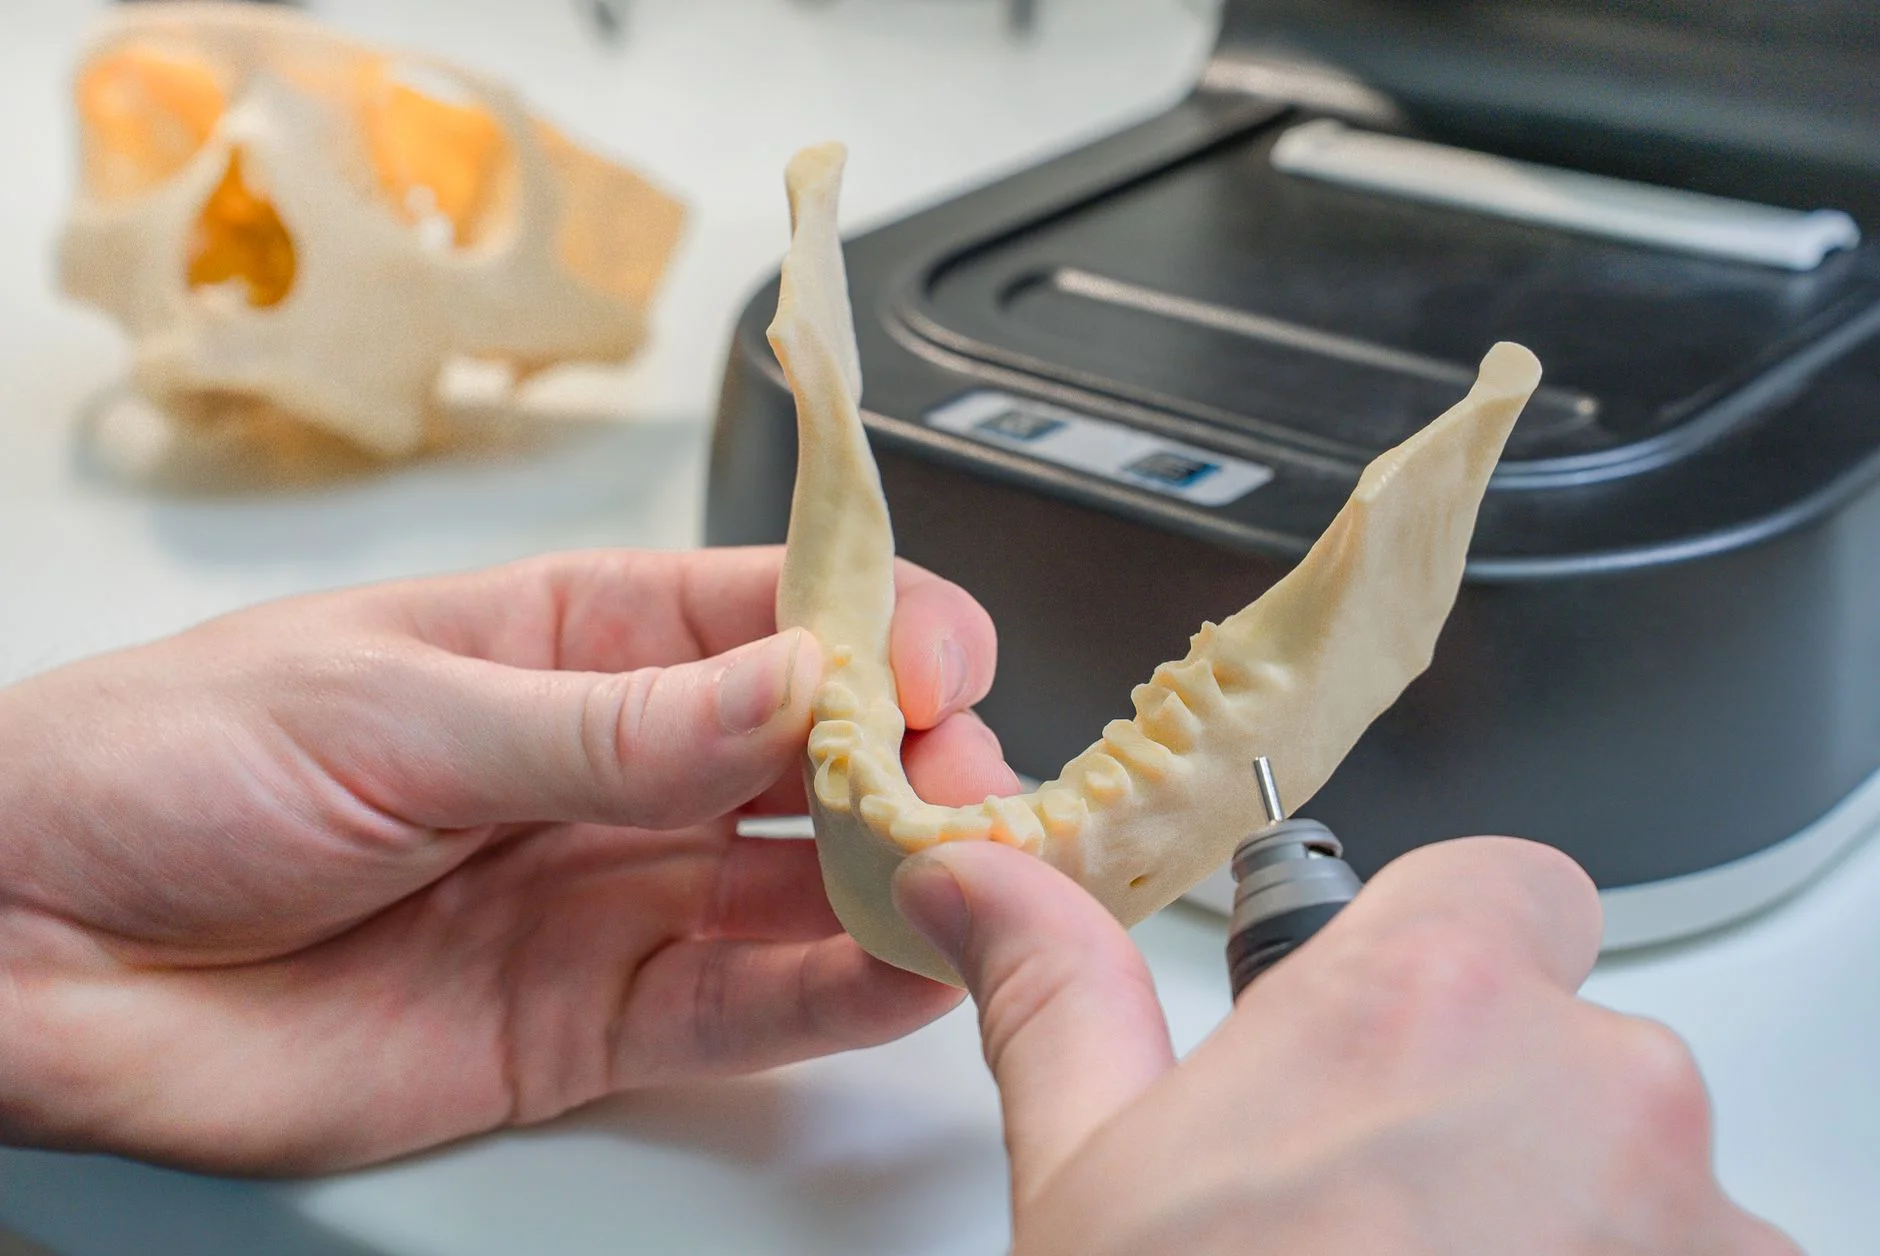
The US Food and Drug Administration (FDA) lists three kinds of 3D-printed medical products already on the market: instruments such as guides that help a surgeon place a device correctly, implants such as cranial plates and hip joints, and external prostheses such as hands. The FDA reviews these devices through the same pathways as devices made in other ways.
Printing is also used in the pharmacy. In August 2015 the FDA approved Spritam (levetiracetam), a treatment for epilepsy made by the company Aprecia, as the first 3D-printed drug product. It is a porous tablet that dissolves quickly with a sip of liquid.
In dentistry, printed models of jaws and teeth help dentists plan work and fit appliances, and our list of dental lab equipment shows what else a dental lab relies on. Made-to-measure prostheses belong to the wider field of assistive technology, which our article on novel technologies for the rehabilitation of paralysed patients also explores.
Engineering and prototyping
Engineers use 3D printers for rapid prototyping: making a test version of a part in hours, checking how it fits, changing the design and printing it again. A change that once needed a new mould can now be made with an edit to a file.
Printing can also create shapes that are very hard to make any other way. GE reports that its 3D-printed metal fuel nozzle for the LEAP jet engine combined 20 parts into a single unit, weighed 25% less than an ordinary nozzle and was more than five times as durable. Those figures come from the company, but they show why industry takes the method seriously.
Space
On 17 November 2014, NASA astronaut Barry "Butch" Wilmore installed the first 3D printer on the International Space Station. A week later, on 24 November, ground controllers sent the command to print the first part made in space. It was a faceplate for the printer's own extruder casing, built by the company Made In Space for NASA, using a low-temperature plastic filament.
The choice of part was clever: it showed that a printer in orbit can make replacement parts, including for itself. For crews far from Earth, printing a spare is far easier than waiting for a delivery. You can read more about the station in our guide to rockets, telescopes, satellites and the International Space Station.
School, home and design
At school and at home, printers make models, replacement parts for broken household items, and designs for art projects. Designing something to solve a real problem, then testing it, is a good way to practise the design process.
Advantages and disadvantages of 3D printing
| Advantages | Disadvantages |
|---|---|
| Good for one-off items and small batches | Slow: a print can take hours |
| Fast, low-cost prototypes | Limited choice of materials |
| Complex, hollow and lattice shapes are possible | Visible layer lines, and parts can be weaker between layers |
| Little waste compared with cutting from a block | Post-processing is often needed, such as removing supports or washing resin |
Frequently asked questions about how a 3D printer works
How does a 3D printer work step by step?
First you create or download a digital 3D model and save it as an STL or 3MF file. Slicing software cuts it into thin layers and writes G-code. The printer then melts, hardens or fuses material one layer at a time, and finally you remove supports and finish the part.
What is 3D printing in simple terms?
3D printing is a way of making a solid object from a digital design by adding material layer by layer. It is called additive manufacturing because material is added, unlike milling or turning, which cut material away from a block. The printer follows instructions made from the 3D model.
Who invented the 3D printer?
No single person invented it. Chuck Hull filed his stereolithography patent on 8 August 1984, and his company launched the first commercial 3D printer in 1987. Carl Deckard patented selective laser sintering and Scott Crump patented fused deposition modelling, so several inventors share the credit.
What is an STL file in 3D printing?
An STL file is a common 3D model format that describes the outside surface of an object as a mesh of small triangles. Each triangle is stored as three corner coordinates and a direction pointing outwards. A slicer reads the file and cuts the model into layers. The format was first documented in 1988.
What does slicing software do?
Slicing software cuts a 3D model into thin horizontal layers and works out the path the print head must follow for each one. It outputs G-code, a list of commands for movement, temperature and material flow. In the slicer you also choose layer height, infill, supports, orientation and speed.
What material do most 3D printers use?
Many desktop printers are FDM machines that use plastic filament, and PLA is a popular beginner choice. PLA is a plant-based polyester made from sources such as corn or sugar cane. Resin printers use liquid resin, and SLS printers use powder, most commonly nylon.
Does layer height affect how long a 3D print takes?
Yes. Thinner layers mean more layers, so the print takes longer. Halving the layer height doubles the number of layers, for example from 250 to 500 for a 50 mm object. Thicker layers print faster but show more visible ridges, because layer height controls vertical detail.
What are the three main types of 3D printer?
The three main types are FDM, SLA and SLS. FDM melts plastic filament and extrudes it through a nozzle. SLA uses light to harden liquid resin. SLS uses a laser to fuse powder, usually nylon. FDM is the most affordable, SLA gives fine detail and SLS makes strong parts.
Can 3D printers print human organs?
Not for transplant. The FDA describes printing living organs as research that is in the early stages of development. Today, 3D printing is used for medical products such as surgical guides, implants such as cranial plates and hip joints, and external prostheses such as hands.